O What a Geek Wordle done with the O What a Geek Blog.
Friday, September 19, 2008
Friday, September 12, 2008
Week 3 Technology
“Library 2.0…it’s not primarily about machines and software: it’s about using the best tools and ideas to provide the best possible service to our users”
[from a presentation by Marylaine Block for the British Columbia Library Association, April 19, 2007]
The Learning 2.0 program is all about teaching you how to use web 2.0 tools, and some of these tools you may find useful to help deliver services in the library.
For Exercise #7, simply blog about anything technology related.Yes, it can be anything that relates to technology! You just need to share a few thoughts.
Perhaps you might like to talk about 'Creating Content' , or a technology you now rely on to perform everyday tasks.Try for at least 100-150 words.
We have all come along way using technology in a very short time. Can you remember learning to use a computer and a mouse (!!!), and having to send an email instead of faxing a memo? Imagine now having to cope without these technologies. Think about what happens when the Internet goes down .
You can also take a look at your co-workers blogs – Look at the Geek Blogs on the right side of the O! What a Geek Blog. See what others are experimenting with and writing about. Try making a comment on someone's blog.
Week 3 More Flickr

#6 More Flickr fun
Like many web 2.0 sites, Flickr has encouraged other people to build their own online applications using images found on the site.Through the use of APIs (application programming interfaces), many people have created third party tools and mashups* that use Flickr images.Here is just a sampling of a few …
- Mappr - allows you to take Flickr images and paste them on a map
- Flickr Color Pickr - lets you find public photos in Flickr that match a specific color.
- Montagr – create a photo mosaic from photos found on Flickr.
Discover more mashups, web apps, and Flickr tools. An interesting site showcasing mashups is the Mash Up Awards .
Discovery Exercise:
Your discovery exercises for this “thing” are to:
- Explore some of the fun Flickr mashups and 3rd party tools that are out there.
- Create a blog post about one that intrigues you.
- Suggested tools to use are FD Toys’ Trading Card Maker.
- And there’s a ton of librarians out there that have created their own Librarian Trading Card.
- So have some fun discovering and exploring some neat little apps.And if you're up to the challenge while you’re at it, why not create a trading card of your own. :)
* Mashup Note: Wikipedia offers some great articles that explain mashups. Basically they are hybrid web applications that take features from one application (like Flickr) and mash it up with another (like a map). In this example, you get Mappr (http://mappr.com/).
Continue on to Week 3, Thing 7
The image above was created by txt2pics
Week 3 Flickr
#5 Discovering Flckr So go ahead, explore the site and have some Flickr photo fun. If you want to learn more you can check out the Wikipedia entry on Flickr & and if you're interested in looking at some photo hosting sites, see this Wired story (note, some links in the Wired article do not work anymore).
Discovery Resources:
- Flickr Learn More tour (6 steps)
- Mediamazine Flickr Tutorials
- Flickr: Popular tags
- Flickr: Interesting- Last 7 days
- Flickr Services (3rd party applications & mashups).
Discovery Exercise:
1 . Take a good look around Flickr and discover an interesting image that you want to blog about. Be sure to include either a link to the image or, if you create a Flickr account, you can use Flickr's blogging tool to add the image in your post.
OR
2. If you have access to a digital camera you might like to upload a picture to Flickr.
i) To upload a photo, first save your photo to your computer (or USB).
ii) Go to the flickr website at http://www.flickr.com/
iii) Sign in
iv) Click on upload photos.
v) Click on browse and locate where you have saved your photo (you can upload more than one photo at once).
vi) You can add tags describing your photo at the bottom of the page. Tag at least one of the images “Owhatageek” and mark it public.
vii) Click upload to complete the process.
viii) Then create a post in your blog about your photo and experience. Be sure to include the image in your post. Once you have a Flickr account, you have two options for doing this: through Flickr's blogging tool or using Blogger's photo upload feature.
For more exploration:
- You might also try searching Flickr for “Omaha Public Library” and see what comes up! Other things to explore include the Nebraska Library Commission and Nebraska Memories.
- Other photosharing and photography websites include http://www.snap.com/, http://www.fotolia.com/, http://www.slide.com/, and http://www.dumpr.net/
PS: A quick word about photo posting etiquette –
When posting identifiable photos of other people (especially minors) is it advisable to get the person's permission before posting their photo in a publicly accessible place like Flickr.
Never upload pictures that weren't taken by you (unless you have the photographer's consent) and always give credit when you include photos taken by someone else in your blog.
Don't forget to label this post on your blog #5 Flickr and talk about what you have learned doing this activity.
Continue on to Week 3, thing 6
The web 2.0 button at the top comes from txt2pics
Friday, September 5, 2008
Week 2
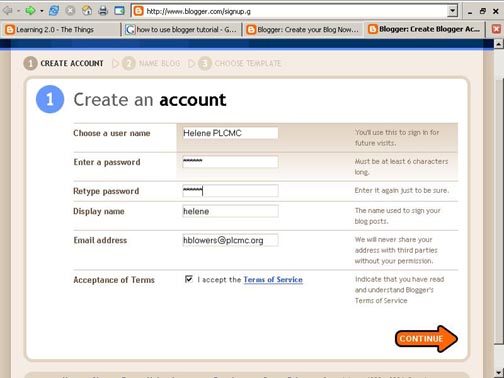
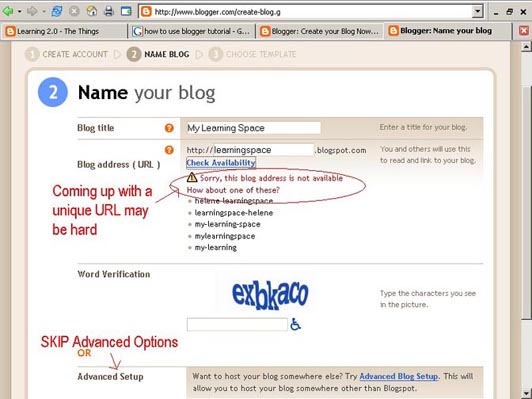
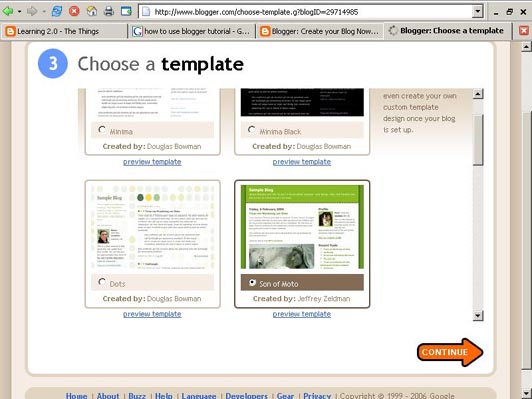
Now that you’ve done some exploring in Learning 2.0 and understand how this program will work, it’s time to setup your very own personal blog to begin recording your thoughts, discoveries and exercises in. For this program, it is recommended that you use Blogger*, a popular free online blog hosting service that is extremely easy to use.
Creating a blog using Blogger takes just three steps:
- Create an account (view screenshot)
- Name your blog (view screenshot)
- Select your template. (view screenshot)
Once you’ve created your blog here are two important things to know:
- To add posts: The maintenance interface that you will use to add posts, edit or change the step-up your blog is accessed online at http://www.blogger.com/ Be sure to write down your login and password.
- To view your blog: Your blog address is http://(xxxx).blogspot.com, (xxxx)=the unique identifier you entered in Step 2. Be sure to also write down your blog address.
If you run into problems or would like more information about blogs and using Blogger here are some discovery resources you can use:
- Freevlog’s Quicktime Tutorial: Setup a Free Blogger Blog Note: Ignore the opening comments about downloading Firefox if your PC doesn’t have it. This will work in Explorer just fine.
- Blogger’s Quick Tutorial
OK -- Now, it’s your turn...
Discovery Exercise:
- Setup a blog for yourself through Blogger. Note: If you already have a blog, please consider setting up a new one just for the Learning 2.0 program. The process is even easier if you already have a blog.
- Add a test post or two. Note: Use one of your test posts to create an entry about what lifelong learning means to you and what you expect to get from this program.
- Have fun!!!!
IMPORTANT NOTE: How you choose to identify yourself on your blog is your choice. You can blog under a screen name, anonymously, or as yourself. However, in order to qualify for the prizes and CE Credit you’ll have to let at least the O! What a Geek team know who you are.
* Use of Blogger is only a recommendation. If there is another blog hosting site that you are more comfortable with, please feel free to use it.
A couple of useful Tips!
- You can use any email address to set up a Blog in Blogger.It is not necessary to set up a Gmail account to create a Blog. You can use your staff email, even if you have a Gmail account.
- Write down the details from your 'Create Account' or print out the page.This may help you to remember your login and password.
#4 Register your Blog with the O! What a Geek Team
When registering your Blog:
- Cut and paste the url (address), of the blog YOU have created (this can be found in the address bar on the page from which you are viewing your blog), into an email message to the O! What a Geek Team
- As you address each exercise please make this the title of your post. eg. #4 Register your Blog. Don't forget to talk about what you did in Week 1 so we can credit you for all 4 things so far!
- For more information -there is an excellent tutorial about creating a blog or a great site of general interest is Blogger's Help page, with handy tips for new members.
- Once you have registered your Blog it will be listed on Geek Blogs. Check out other Geek Blogs as to see what others are doing, gain inspiration and provide support via the comments section in the individual blogs.
Tracking your progress
Second, you need to email the O! What a Geek Team with your name, the name and URL of your blog.
Once you start your blog you'll write a post at least each week covering the things learned that week (if you'd rather write a post for each thing that is okay too). A post should be at least 100 words. It should be more than: I completed this assignment. Try to put some thought into it. Did you like the things? What did you discover? Did you learn anything new? Was it FUN? And say why or why not. These are just ideas to get you started.
Your blog will have an RSS feed and the Think Tank O! What a Geek Team will be subscribed to your blog (so you know someone is reading) and we'll check off your progress
Wednesday, September 3, 2008
CE Credits
And what is even better, you have to do nothing more. Once you're registered, we'll be keep track of your progress. So we'll email Laura Johnson at the Commission to let her know who gets the credits. How is that for easy?
So if having fun, learning some new things and winning a prize aren't enough incentive for you -- how about earning those CE credits?
There will be no partial credits awarded. Credit will only be awarded if you complete all 23 things.