Thursday, October 30, 2008

Week 9, Thing 23

#23 Is this really the end? Or just the beginning ...

Wow! Congratulations!! You’ve reached the 23rd thing. Be sure to give yourself a pat on the back for completing the program. At the start we asked you to choose a prize – if you haven’t told the OwhataGeek team already, be sure you do now – you’ll get it in December.

But before you do you need to do one more blog entry.

For your last and final exercise for this program please reflect on your learning journey and post a few thoughts. Here are some questions to prompt you if you're drawing a blank:
  • What were your favorite discoveries or exercises on this learning journey?
  • How has this program assisted or affected your lifelong learning goals?
  • Were there any take-aways or unexpected outcomes from this program that surprised you?
  • What could we do differently to improve upon this program’s format or concept?
  • What other Web 2.0 tools do you know about that we didn’t cover that you want other staff to know about?


In closing, on behalf of the O!What a Geek team and the Think Tank, I want to thank each and every one of you for joining us on this journey. We hope that you have not only learned some new things that you can use in your job but also had some fun along the way. We have been impressed by your willingness to undertake all the tasks and how many of the OPL Geeks love their jobs. If you have time, take a look at some other blogs in the Geek Blogs and read some entries. You might be surprised at what you learn.


Now to end on a fun note, take a look at some bad web 2.0 names (this came from ALA Direct for October 29, 2008).


Congratulations again,


Deirdre Routt aka Rapunzel 2.0

Week 9, Thing 22

#22 Media and Book Downloads (or "You are almost done!")

We have some fun and easy ways to provide our customers with materials in a variety of downloadable formats. These are materials they can access from home and use in different ways.

Overdrive provides us with both downloadable eBooks and audio books. The eBooks can be viewed on a computer or transferred to a handheld reader such as a PDA (personal Digital Assistant). They are viewed using Adobe or MobiPocket software, which can also be downloaded from the Overdrive site. The audio books are downloaded using the Overdrive console and can be played on the computer or transferred to a MP3 player. Some can be burned to a CD for permanent use. Most of these titles are listed in our catalog but the Overdrive site is separate from the catalog.

We also have downloadable movies and TV series from MyLibraryDV. These you view on your computer and need to download the MyLibraryDV player which is where the movies and TV series are accessed. The titles are listed in our catalog – the link in the catalog takes you the main MyLibraryDV screen.

Downloadable eBooks and audiobooks just for kids are available from TumbleBooks. These fun books can be accessed through the Omaha Public Library’s Kid’s page – they don’t need any additional download.

Discovery Resources:
OverDrive (these are from SamePage. If you can't get these to work they can be found on SamePage, Staff Learning, eBook & Audiobook (OverDrive) Training)
MyLibraryDV

TumbleBooks


Discovery Exercise:
1. Choose one of the downloadable materials above, OverDrive, MyLibraryDV or TumbleBooks and try using it. It would be best to choose one you have not used. Try downloading and using the materials.

2. Blog about what you chose and why. Other questions do consider: did it work? Was it easy or was it frustrating to use? Are these good materials to offer at a library? Why or why not? Do you feel comfortable assisting patrons in using this format?

You are almost done, continue on to Week 9, Thing 23

Tuesday, October 28, 2008

Week 9, Thing 21

#21 Podcasts, Smodcasts!
The word podcast is used to refer to a non-musical audio or video broadcast that is distributed over the Internet. What differentiates a podcast from regular streaming audio or video is that podcasts can be delivered automatically through RSS (remember week 4?)

Podcasts take many forms, from short 1-10 minutes commentaries (like the ones used in the original Learning 2.0 program) to much longer in person interviews or panel group discussions. There’s a podcast out there for just about every interest area and the best part about this technology is that you don’t need an iPod or a MP3 player to use it. Since podcasts use the MP3 file format, a popular compressed format for audio files, you really just need a PC (or portal device) with headphones or a speaker.

There are podcasts of radio shows, sports casts, lectures, television or Internet shows and on and on. iTunes, the free downloadable application created by Apple is the directory finding service most associated with podcasts, but if you don’t have iTunes installed there are still plenty of options.

For this discovery exercise you are asked to take a look at some popular podcast directory tools. Do some exploring on your own and locate a podcast that is of interest to you. Once found, you can easily pull the RSS feed into your Bloglines account as well, so that when new casts become available you’ll be automatically notified of their existence.

Discovery Resources:

  • To find out more about podcasts start with Wikipedia article on Podcasts
  • iTunes Podcast information – from what is a podcast to how to find and use them on iTunes
  • There are many, many podcast directories and finding tools out there. Here are just three of the more popular ones that, unlike iTunes, don't require a software download:
    o PodcastDirectory.com
    o Podcastalley.com
    o MyYahoo audio

What? You want to learn how to be a podcaster too? (Optional Resources for those who want to learn create podcasts)

Discovery Exercise:
1. Take a look at one or two of the podcast directories listed and see if you can find a podcast that interests you. See if you can find some interesting library related podcasts here like book review podcasts or library news.

2. Add the RSS feed for a podcast to your Bloglines account.

3. Create a blog post about your discovery process. Did you find anything useful here? How could podcasts be used in the library?

Continue on to Week 9 , Thing 22

Monday, October 27, 2008

Week 9, Thing 20

#20 You too can YouTube

Note: You'll need headphones for this exercise

Online video hosting sites have continued to expand allowing users easily to upload and share videos on the web. Among all the web 2.0 players in this area, YouTube has been one of the main players since its launch in November 2005. YouTube not only allows users to upload their own video content easily, but also embed clips into their own sites easily.

Do some searching around YouTube and see what the site has to offer. You'll find everything from Kool-Aid commercials and the Theme Song to the Monkees to library dominoes, how to use a Self-Check machine and an ad from Kiplinger’s about Research Librarians. Of course, like any free site you’ll also find a lot not worth watching too. But that doesn’t mean you shouldn’t explore and see for yourself what the site has to offer. :)

Discovery Exercise:
1. Explore YouTube & find a video worth adding as an entry in your blog.
2. Create a blog post about your experience. What did you like or dislike about the site and why did you choose the video that you did? Can you see any features or components of the site that might be interesting if they were applied to library websites?

Other popular video hosting sites:

NOTE: Videos, like music downloads, are bandwidth hogs. It is recommended that you complete this exercise during light internet usage times.

Continue on to Week 9, thing 21

Monday, October 20, 2008

Week 8, Thing 19

#19 Discovering web 2.0 tools
Throughout the course of this Learning 2.0 program we’ve explored just a small sampling of these new internet technologies and websites that are empowering users with the ability to create and share content. But given time there are so many more we could explore.

If you attended the NLA/NEMA conference keynote lecture on Thursday, October 16 by Annette Lamb you received a whirlwind tour of many web 2.0 tools and their applications in libraries. If you missed it or wish to review it, here is link to the presentation: Recipes for Success. This is a great resource to dip into and explore parts of as time allows.

Web applications, like many other web 2.0 tools, have been growing fast. It is still hard to tell how they are widely accepted and used. Most businesses are not going to stop using various “office suites” of products for word processing, spreadsheets and databases. However, it is clear that there are increasing numbers of new collaborative, social networking and information tools and they're not going to go away (at least anytime soon).

For this discovery exercise, you’ll select ONE site from the lists on Web 2.0 Awards or Lambs’ Recipes for Success and explore it. Be careful to select a tool that is Free and that doesn't require a plug-in or download. The majority of these free, so this shouldn't be a problem.

Discovery Exercise:
1. Select any site/tool from the lists on Web 2.0 Awards or Recipes for Success. Explore the site you selected.
2. Create a post about your discovery. What did you like or dislike about the tool? What were the site’s useful features? Could you see any applications for its use in a library setting?

Web 2.0 – with so much to explore, just start with ONE. :)

Week 8, Thing 18

#18 Web-based Apps: They're not just for desktops
The availability and use of online productivity web-based applications (think word processing and spreadsheets) has exploded over the past few years and for good reasons! These powerful applications provide users with the ability to create and share documents over the internet without the need of installed desktop applications. Some experts speculate that this emerging trend may mean the death to Microsoft Office and other software-based productivity tools, while others think web-based applications have their place, but not in the office. But no matter which side of the office suite platform you side with, on this both sides seem to agree; web-based apps have their place.

One major benefit of web-based applications it that they eliminate the need to worry about different software versions or file types as you email documents or move from PC to PC. You are also freed up from carrying a data disc or flash drive around. A further bonus is that they easily accommodate collaboration by allowing multiple users to edit the same file (with versioning) and provide users the ability to easily save and convert documents as multiple file types (including HTML and pdf). And, you can even use many of these tools, such as Zoho Writer and Google Docs (formerly known as Writely), to author and publish posts to your blog. It’s this type of integration with other web 2.0 tools that also makes web-based apps so appealing.

For this discovery exercise, you are asked to take a look at web-based word processing tools such as Zoho Writer or Google Docs, create a simple document and then document your discoveries in your blog. If you're up to the challenge, you might even export your document as an HTML file or publish it to your blog. With web-based applications, the possibilities are endless.

Discovery Resources:
A short list of web-based productivity applications – Note: Helene Blowers authored this list in 2006 using ZohoWriter and exported it as HTML.

Discovery Exercise:
1. Create a free account for yourself in Zoho Writer or Google Docs
2. Explore the site and create a few test documents.
3. Try out Zoho Writer’s or Google Docs features and create a blog post about your discoveries.

Optional: If you're up for the challenge, see if you can write something in a web-based word processor and then use it to post to your blog.

BTW: Here’s a document (viewable as a webpage) Helene Blowers mocked up in Zoho about some of the features she found beneficial.

Continue on to Week 8, Thing 19

Friday, October 10, 2008

Week 7, Thing 17

#17 Playing around with PBWiki

"Sandbox" is the term that wikis often use to describe the area of the website that should be used for pure play. For this discovery and exploration exercise, Helene Blowers at PLCMC set up a whole Learning 2.0 Favorites wiki* that’s for nothing but play!

For this “explore-and-play-with-wikis” exercise, you are asked to add an entry or two to the PBwiki Learning 2.0 wiki. The theme of this wiki is simply “Favorites” : Favorite books, favorite vacation spots, favorite restaurants, favorite anything …all you need to do is play and add your thoughts. To mark your adventure on this site, you should add your blog to the Favorite Blogs page.

Discovery Resources:

Discovery Exercise:
1. Access the PLCMC Learning 2.0 wiki and create a login account for yourself. At the bottom of the log-in page, in the lower left-hand corner, it says "Password = plcmc". That's the verification code. (Thanks to Sarah W. for this hint!).

2. Add your blog to the Favorite Blogs page. That's how we'll know that you've been there. It’s easy to do if you follow this simple syntax:
Example:
[ URL Title of blog]
[ http://plcmclearning.blogspot.com Learning 2.0 ]

With brackets [ ] and just a little typing, you’ve added a link - yup, it’s as easy as that!

* NOTE: The PLCMCLearning Wiki was created using the free version of PBWiki, a tool that lets you create webpages that anyone can edit.
OPTIONAL: Add a favorite or two to a few other pages (Favorite books, favorite vacation spot, etc). And, if you feel up to the challenge, you might even want to create a separate page for book review or short travel essay and link up to that.

3. Create a post in your blog about the experience.

Week 7, Thing 16

#16 So What’s in a Wiki?

A wiki is a collaborative website and authoring tool that allows users to easily add, remove and edit content. You probably already know, and may have even used, Wikipedia, the online open-community encyclopedia. It is the largest and perhaps the most well known of these knowledge sharing tools. With the benefits that wikis provide the use and popularity of these tools has continued to grow. Some of the benefits that make wikis so attractive are:
  • Anyone (registered or unregistered, if unrestricted) can add, edit or delete content.
  • Tracking tools within wikis allow you to easily keep up on what been changed and by whom.
  • Earlier versions of a page can be viewed and reinstated when needed.
  • And users do not need to know HTML in order to apply styles to text or add and edit content. In most cases simple syntax structure is used.

As the use of wikis has grown over the last few years, libraries all over the country have begun to use them to collaborate and share knowledge. Among their applications are pathfinder or subject guide wikis, book review wikis, ALA conference wikis, sharing meeting information and even library best practices wikis.

Discovery Resources:

Use these resources to learn more about wikis:


Discovery Exercise:
1. For this discovery exercise, you are asked to take a look at some library wikis and blog about your finding. Here’s a few examples to get you started:

2. Create a blog post about your findings. What did you find interesting? What types of applications within libraries might work well with a wiki?


So what's in a wiki? Find out by doing some exploring on your own.

Continue on to Week 7, Thing 17

Monday, October 6, 2008

Week 6, Thing 15

#15 On Library 2.0 & Web 2.0 ...

Library 2.0 is term used to describe a new set of concepts for developing and delivering library services. The name, as you may guess, is an extension of Web2.0 and shares many of its same philosophies and concepts including harnessing the user in both design and implementation of services, embracing constant change as a development cycle over the traditional notion of upgrades, and reworking library services to meet the users in their space, as opposed to ours (libraries).
Many have argued that the notion of Library 2.0 is more than just a term used to describe concepts that merely revolve around the use of technology; it also a term that can be used to describe both physical and mindset changes that are occurring within libraries to make our spaces and services more user-centric and inviting. Others within the profession have asserted that libraries have always been 2.0: collaborative, customer friendly and welcoming. But no matter which side of the debate proponents fall, both sides agree that libraries of tomorrow, even five or ten years from now, will look substantially different from libraries today.

Discovery Resources:

Discovery Exercise:
1. Read some of the perspectives on Library 2.0 from the list above.


2. Create a blog post about your thoughts on Library 2.0 - It's many things to many people. What does it mean to you?

Week 6, Thing 14

#14 Getting not-so-technical with Technorati

So now that you’ve been blogging for awhile, you might be wondering just how big the blogosphere is. Well, according to Technorati’s annual report on blogs, State of the Blogosphere 2008 (issued in September 2008), 133 million blogs have been indexed by Technorati since 2002. 7.4 million blogs were posted in the 6 months prior to the report.

Blogging is so easy that these publishing tools are being taken advantage of by almost every industry, including libraries. Blogging has become a commercial enterprise – with many bloggers accepting advertising. Blogs have also become a trusted authority in both news and entertainment.

So how does a person get their blog listed as part of the blogosphere and how can you tag your posts with keywords to make them more findable through a Technorati search? The answer to the first question is that your blog is probably already being captured by Technorati due to the fact that you're already using Blogger, the most popular blogging tool. But if you want to join the party and have your blog officially listed on Technorati and also take advantage of the watchlist and other features, you’ll need to claim your blog yourself. As for tagging posts with Technorati tags? This is easy, too. All you need to do is add a little bit of HTML code to the bottom of your post (see the example below) and Technorati will pick up these tags when it spiders (or web crawls) your site. There are a lot of new features that have been added to Technorati this past summer, including new ways to search for blogs. You can search for keywords in blog posts, search for entire blog posts that have been tagged with a certain keyword, or search for blogs that have been registered and tagged as whole blogs about a certain subject (like photography or libraries).

Discovery Resources:
  • Technorati Tour –from 2006 of the Technorati features
  • Technorati Popular feature
  • Tehcnorati Help – includes FAQ, Discussions and Troubleshooting

Discovery Exercise:
1. Take a look at Technorati and try doing various keyword searches in the different search areas. Do you get different results depending on where you search?


2. Explore popular blog, searches and tags. Is anything interesting or surprising in your results?


3. Create a blog post about your discoveries on this site.

OPTIONAL: If you're up for a challenge, learn how to tag your posts by with Technorati tags so they can join tag searches. Create a post about something. It can be anything you want and add the HTML code to the bottom to tag it as “PLCMCL2.” You may also want to consider claiming your blog and creating a watchlist.

NOTE: When adding HTML code, you'll want to make sure you're in Blogger's Edit HTML window.

There's a lot to explore.

Technorati Tag: PLCMCL2

Continue on to Week 6, Thing 15

Week 6, Thing 13

#13 Tagging, folksomonies & social bookmarking in Delicious

Tagging is an open and informal method of categorizing that allows users to associate keywords with online content (webpages, pictures & posts). Unlike library subject cataloging, which follows a strict set of guidelines (i.e.Library of Congress subject headings), tagging is completely unstructured and freeform, allowing users to create connections between data anyway they want.

In the past few weeks, we’ve already explored a few sites – Flicker and LibraryThing to name two --that allow users to take advantage of tagging and in week 3 some even used a common tag (owhatageek) to create an association between photos that we individually uploaded. This week, in addition to exploring Technorati tagging, we want to also take at popular social bookmarking site called Delcious (formerly known as Del.icio.us).

Delicious is a social bookmarking manager which allows you to bookmark a web page and add tags to categorize your bookmarks.

Many users find that the real power of Delicious is in the social network aspect, which allows you to see how other users have tagged similar links and also discover other websites that may be of interest to you. You can think of it as peering into another users’ filing cabinet, but with this powerful bookmarking tool each user's filing cabinet helps to build an expansive knowledge network.

For this discovery exercise, you are asked to take a look at Delicious and learn about this popular bookmarking tool.

Discovery Resources:

  • Otter Group Delicious tutorial (8.30 min podcast with visuals) – Although this is from 2006 it presents a good overview of Delicious and why it is a useful tool.
  • Us.ef.ul: A beginners guide to Delicious – This is from 2005 but it presents useful information on getting started with Delicious.

Discovery Exercise:
1. View one of the Discovery Resources listed above to get a good overview of the features in Delicious.


2. Take a look around Delicious using the PLCMCL2 account that was created for the original 23 Things exercise by Helene Blowers. Note: In this account you will find lots of resources that have been highlighted or used throughout the course of the Learning 2.0 program.


3. Explore the site options and try clicking on a bookmark that has also been bookmarked by a lot of other users. Can you see the comments they added about this bookmark or the tags that they used to categorize this reference?


4. Create a blog post about your experience and thoughts about this tool. Can you see the potential of this tool for research assistance? Or just as an easy way to create bookmarks that can be accessed from anywhere?


OPTIONAL: If you’re up to the challenge, create a Delicious account for yourself and discover how this useful bookmarking tool can replace your traditional browser bookmark list. Also, talk with co-workers who have been using Delicious to see what they like about it. Some Geeks have already posted on using Delicious – ask them questions.

Continue on to Week 6, Thing 14.

Friday, September 26, 2008

Week 5, Thing 12

#12 Roll your own search engine

Do you have a group of websites that are your favorites? Or a set of online resources that are similar that you frequently use to answer homework or reference questions? Well Rollyo may be the tool for you. Rollyo allows you to create your own search tool for the just the websites you know and trust.

Take a look at some of these search rolls that have already been created:


Try a search for broad terms like "homework” or “history” to see results listed from multiple sites.


One of our own Geeks has a post on her blog, OPL’S PSA: Omaha Library’s Passably Sane Assistant on Rollyo


Discovery Exercise:
1. Explore Rollyo and create an account for yourself.


2. Create a search roll for any subject you like.


3. Create a post in your blog about your experience and link to your search roll. Can you see a potential use for tools like this?


OPTIONAL: Add your search roll to your blog using the "Create a Searchbox" tool.

Rollyo - You just never know when this little tool might come in handy.

Week 5, Thing 11


#11 A thing about LibraryThing


Are you book lover or cataloger at heart? Or do you enjoy finding lost and forgotten gems on the shelf to read? Then LibraryThing may be just the tool for you. Developed for booklovers, this online tool not only allows you to easily create an online catalog of your own it also connects you to other people who have similar libraries and reading tastes. Add a book to your catalog by just entering the title -- It’s so easy that you don’t even need MARC record training to do it – or connect with other users through your similar reading tastes. There are lots of ways to use LibraryThing. You can even view your books on a virtual shelf, add a widget to display titles that are in your catalog or install a LT Search box on your blog.


So why not join the ranks and create your own library online. With over 65,000 registered (BTW: LibraryThing also has group forum for librarian users) and over 4.7 million cataloged books, you're bound to discover something new.

A recent development for LibraryThing is LibraryThing for Libraries. This adds some of the Web 2.0 aspects of LibraryThing to the library catalog – it brings in LibraryThing’s users’ tags (edited to exclude things like beach read), word clouds, ratings & reviews. Danbury Public Library was the first libraries to use LibraryThing for Libraries.


Discovery Resources:


Discovery Exercise:


1. Take a look around LibraryThing and create an account.

2. Add a least 5 books to your library.


3. Blog about your findings and be sure to link to your LibraryThing catalog.


Continue to Week 5, Thing 12

Thursday, September 25, 2008

Week 5, Thing 10


#10 Play around with Image Generators

Generators? No, not those gas powered back-up things. These generators allow you to easily manipulate image and graphics to create fun images like those shown here (and which you've seen in earlier posts too).

For this discovery exercise, just have fun. Find a few fun image or text generators to play around with and write a post in your blog about one of your favorites and display the result. Often adding the image you mocked up to your blog is as simple as copying and pasting code that the page provides. If not, you may just need to right click on the image and then save it to your hard drive before using Blogger’s image button to add it to your post (which is what I did for this post). If you’re having difficulty getting your image added to a post in your blog, ask a co-worker for help. In looking at several staff blogs, it’s easy to see that we have lots of people in the system who have figured out how easy it is to add images to their blogs.
Discovery Resources:
  • The Generator Blog (this has tons of generators, scroll through the list on the left side)
  • Letter James (this has some generators in things like e-Cards and it is mainly free)
  • FD Toys (this is the same as the Flickr mashups from Week 3)
  • Wordle (this takes text from a link and makes an image – thanks to Nikki for suggesting this one earlier)

Also try searching for online generators, text generators or image generators!


Discovery Exercise:

1. Play around with some image generators and find one that you like.

2. Post the result of your discovery process in your blog. Note: Be sure to include a link to the image generator itself, so other participants can discover it too.


So take some time and have fun with this exercise. And remember to be tasteful too!


* Images created with Birthday Cake and Classic Car Grill Sign found on The Generator Blog


Continue to Week 5, Thing 11

Monday, September 22, 2008

Week 4, Thing 9

#9 Finding Feeds

Now that you have a newsreader (your Bloglines account), you can begin adding other newsfeeds that interest you. There are several ways you can locate newsfeeds:

  • When visiting your favorite websites -- look for news feed icons that indicate the website provides it. Often a feed icon will be displayed somewhere in the navigation bar of the site. (Here's an image that contains a sampling of several feed icons).
  • Use Blogline's Search tool - Bloglines search tool lets you search for news feeds in addition to posts, citations and the web. Use the Search for Feeds option to locate RSS feeds you might be interested in.


Other Search tools that can help you find feeds:

  • Topix.net - This search tool allows you to locate recent newsfeed items based upon keyword or phrase searching. The tool focuses specifically on news and media outlet RSS feeds for information, not weblogs.
  • Syndic8.com - Syndic8 is an open directory of RSS feeds that contains thousands of RSS feeds that users have submitted.
  • Technorati - Technorati is a popular blog finding tool that lets you search for blogs. Since RSS feeds are inherent to all blogging tools, Technorati Blog Search can help you find RSS feeds for topic specific blogs you may be interested in. Additional Resource: Technorati Tutorial on finding and adding your blog

Discovery Exercise:
Explore some of the search tools noted above that can help you locate some news feeds.

Create a blog post about your experience. Don't know what to blog about? Here some questions to think about ...

Which method of finding feeds did you find easiest to use?
Which Search tool was the easiest for you?
Which was more confusing?
What kind of useful feeds did you find in your travels?
Or what kind of unusual ones did you find?
What other tools or ways did you find to locate newsfeeds?

Friday, September 19, 2008

Week 4, Thing 8


#8 Make life "really simple" with RSS & a newsreader


You’ve heard of RSS? You’ve seen those small funny tags on websites? You’ve heard co-workers and acquaintances swear by it, but still have no idea what RSS is? That’s okay. According to a 2006 survey you’re still in the majority. Now if you Google RSS Feeds you will get over 756,000,000 hits. In the information world, RSS has not only revolutionized the way news, media and content creators share information, but it has also changed the way everyday users are consuming information.

RSS, according to one definition, stands for “Really Simple Syndication” and is a file format for delivering regularly updated information over the web. You can check out a Wikipedia article or there is website WhatisRSS.com. Some of you may also have taken Michael Sauers’s (from the Nebraska Library Commission) workshops on RSS feeds. The NLC has some additional information on RSS with links to more pages explaining this tool.

Have you ever wondered how would you keep up with a blog? Let’s skip the question of why you would – but if you were interested in a blog or a website that was updated at various intervals, you would have to visit every day or every few days, just to keep up! Think about the websites and news information sources you visit every day. It takes time to visit those sites and scour the ad-filled and image-heavy pages for just the text you want to read, doesn’t it? Now imagine if you could visit all those information sources and web pages in just one place and all at the same time … without being bombarded with advertisingwithout having to search for new information on the page you’d already seen or read beforeand without having to consume a lot of time visiting each site individually. Would that be valuable to you? Well, it’s available now through a newsreader and RSS.

This week’s discovery exercises focus on learning about RSS news feeds and setting up a 
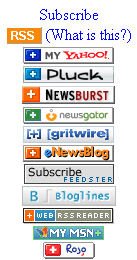
Bloglines account (a free online newsreader) for yourself to bring your feeds together. If you prefer you can set up an account with Google Reader or Newsgator but the information provided here is for setting up a Bloglines account. You can always follow directions on the other sites if you prefer. If you want one less username/password combo to remember Google Reader as you can use the same combo that you used to set up your blog.

Discovery Resources:
  • Feed Me: A gentle introduction to Internet feeds - a tutorial from Palinet, a library cooperative. Some information may have changed since this tutorial was created.
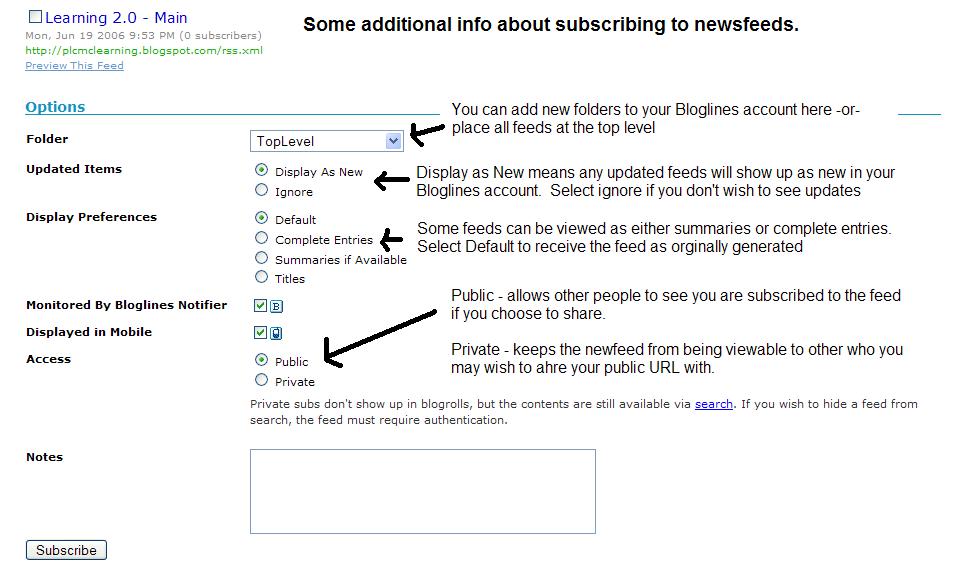
  • Using Bloglines Tutorial (how to keep up with dozens of blogs everyday) – This online tutorial walks you through how to setup a Bloglines account and add newsfeeds. Follow Steps 1 to 3 to set up your Bloglines account. (Steps 4 – 9 are optional and cover how to subscribe to different types of feeds (podcasts, Flickr albums, etc.)). Again, some information may have changed since this blog post/tutorial was created.
  • RSS in Plain English: A simple and user friendly overview of RSS created by Commoncraft Video on Youtube.
  • Adding RSS Feeds to Bloglines - A short YouTube video created by Helene Blowers showing how to add feeds in Bloglines.
  • Additional Bloglines news feed subscription information (screenshot image)
  • Your co-workers - tap into their knowledge or work through your discovery process together. Several OPL staff have already attended Michael Sauer’s workshops on RSS as noted earlier - seek them out and ask them to show what they know.

    Discovery Exercise:

1. Follow the discovery resources above to learn more about RSS and newsreaders.

2. Create a free online Bloglines account for yourself and subscribe to at least 10 feeds to your reader. See Using Bloglines Tutorial steps 1-3 for instructions.

Feeds:
Try adding a few other types of feeds from various library related or other sources (you may like to select a couple from the list below)

Blogs:

  • Subscribe to several of your co-workers' feeds. This is as easy as typing the blog URL into the subscribe field in Bloglines. Or go to your friends' blogs, click on the 'subscribe' or 'atom' button at the bottom of the page. Try it, it's easy!
  • You can subscribe to blogs in Blogger. Sign in to your Blogger account – this will take you to your dashboard or click on your profile on your blog – scroll down and see the reading list? Here you can add the blogs of your co-workers. Open up O! What a Geek in a separate screen and choose which blogs you want to follow (you can also hide your reading list from others if you wish).

3. Create a post in your blog about this exercise.

Don’t know what to blog about? Think about these questions:

  • What do you like about RSS and newsreaders?
  • How do you think you might be able to use this technology in your work or personal life?
  • How can libraries use RSS or take advantage of this new technology?

PS: Once you tackle this discovery exercise, you've tackled the most difficult one of the whole 23. :)

Continue on to week 4, thing 9

O What a Geek Wordle (Week 5, Thing 10)


O What a Geek Wordle done with the O What a Geek Blog.

Friday, September 12, 2008

Week 3 Technology

# 7 Blog about technology
“Library 2.0…it’s not primarily about machines and software: it’s about using the best tools and ideas to provide the best possible service to our users”
[from a presentation by Marylaine Block for the British Columbia Library Association, April 19, 2007]

The Learning 2.0 program is all about teaching you how to use web 2.0 tools, and some of these tools you may find useful to help deliver services in the library.

For Exercise #7, simply blog about anything technology related.Yes, it can be anything that relates to technology! You just need to share a few thoughts.

Perhaps you might like to talk about 'Creating Content' , or a technology you now rely on to perform everyday tasks.Try for at least 100-150 words.

We have all come along way using technology in a very short time. Can you remember learning to use a computer and a mouse (!!!), and having to send an email instead of faxing a memo? Imagine now having to cope without these technologies. Think about what happens when the Internet goes down .

You can also take a look at your co-workers blogs – Look at the Geek Blogs on the right side of the O! What a Geek Blog. See what others are experimenting with and writing about. Try making a comment on someone's blog.

Week 3 More Flickr


#6 More Flickr fun
Like many web 2.0 sites, Flickr has encouraged other people to build their own online applications using images found on the site.Through the use of APIs (application programming interfaces), many people have created third party tools and mashups* that use Flickr images.Here is just a sampling of a few …

  • Mappr - allows you to take Flickr images and paste them on a map
  • Flickr Color Pickr - lets you find public photos in Flickr that match a specific color.
  • Montagr – create a photo mosaic from photos found on Flickr.


Discover more mashups, web apps, and Flickr tools. An interesting site showcasing mashups is the Mash Up Awards .

Discovery Exercise:

Your discovery exercises for this “thing” are to:

  1. Explore some of the fun Flickr mashups and 3rd party tools that are out there.
  2. Create a blog post about one that intrigues you.
  • Suggested tools to use are FD ToysTrading Card Maker.
  • And there’s a ton of librarians out there that have created their own Librarian Trading Card.
  • So have some fun discovering and exploring some neat little apps.And if you're up to the challenge while you’re at it, why not create a trading card of your own. :)

* Mashup Note: Wikipedia offers some great articles that explain mashups. Basically they are hybrid web applications that take features from one application (like Flickr) and mash it up with another (like a map). In this example, you get Mappr (http://mappr.com/).

Continue on to Week 3, Thing 7


The image above was created by txt2pics

Week 3 Flickr

#5 Discovering Flckr
Photo sharing websites have been around since the 90s, but it took a small startup site called Flickr to catapult the idea of “sharing” into a full blown online community. Within the past couple of years, Flickr has become the fastest growing photo sharing site on the web and is known as one of the first websites to use keyword “tags” to create associations and connections between photos and users of the site.For this discovery exercise, you are asked to take a good look at Flickr and discover what this site has to offer. Find out how tags work, what groups are, and all the neat things that people and other libraries are using Flickr for.

So go ahead, explore the site and have some Flickr photo fun. If you want to learn more you can check out the Wikipedia entry on Flickr & and if you're interested in looking at some photo hosting sites, see this Wired story (note, some links in the Wired article do not work anymore).

Discovery Resources:


Discovery Exercise:

In this discovery exercise, you have two options…

1 . Take a good look around Flickr and discover an interesting image that you want to blog about. Be sure to include either a link to the image or, if you create a Flickr account, you can use Flickr's blogging tool to add the image in your post.

OR

2. If you have access to a digital camera you might like to upload a picture to Flickr.
i) To upload a photo, first save your photo to your computer (or USB).
ii) Go to the flickr website at http://www.flickr.com/
iii) Sign in
iv) Click on upload photos.
v) Click on browse and locate where you have saved your photo (you can upload more than one photo at once).
vi) You can add tags describing your photo at the bottom of the page. Tag at least one of the images “Owhatageek” and mark it public.
vii) Click upload to complete the process.
viii) Then create a post in your blog about your photo and experience. Be sure to include the image in your post. Once you have a Flickr account, you have two options for doing this: through Flickr's blogging tool or using Blogger's photo upload feature.

For more exploration:

PS: A quick word about photo posting etiquette
When posting identifiable photos of other people (especially minors) is it advisable to get the person's permission before posting their photo in a publicly accessible place like Flickr.

Never upload pictures that weren't taken by you (unless you have the photographer's consent) and always give credit when you include photos taken by someone else in your blog.

Don't forget to label this post on your blog #5 Flickr and talk about what you have learned doing this activity.

Continue on to Week 3, thing 6

The web 2.0 button at the top comes from txt2pics

Friday, September 5, 2008

Week 2

#3 Get blogging in 3 steps

Now that you’ve done some exploring in Learning 2.0 and understand how this program will work, it’s time to setup your very own personal blog to begin recording your thoughts, discoveries and exercises in. For this program, it is recommended that you use Blogger*, a popular free online blog hosting service that is extremely easy to use.

Creating a blog using Blogger takes just three steps:

  1. Create an account (view screenshot)
  2. Name your blog (view screenshot)
  3. Select your template. (view screenshot)

Once you’ve created your blog here are two important things to know:

  • To add posts: The maintenance interface that you will use to add posts, edit or change the step-up your blog is accessed online at http://www.blogger.com/ Be sure to write down your login and password.
  • To view your blog: Your blog address is http://(xxxx).blogspot.com, (xxxx)=the unique identifier you entered in Step 2. Be sure to also write down your blog address.

If you run into problems or would like more information about blogs and using Blogger here are some discovery resources you can use:

OK -- Now, it’s your turn...

Discovery Exercise:

  1. Setup a blog for yourself through Blogger. Note: If you already have a blog, please consider setting up a new one just for the Learning 2.0 program. The process is even easier if you already have a blog.
  2. Add a test post or two. Note: Use one of your test posts to create an entry about what lifelong learning means to you and what you expect to get from this program.
  3. Have fun!!!!


IMPORTANT NOTE: How you choose to identify yourself on your blog is your choice. You can blog under a screen name, anonymously, or as yourself. However, in order to qualify for the prizes and CE Credit you’ll have to let at least the O! What a Geek team know who you are.

* Use of Blogger is only a recommendation. If there is another blog hosting site that you are more comfortable with, please feel free to use it.


A couple of useful Tips!

  • You can use any email address to set up a Blog in Blogger.It is not necessary to set up a Gmail account to create a Blog. You can use your staff email, even if you have a Gmail account.
  • Write down the details from your 'Create Account' or print out the page.This may help you to remember your login and password.


#4 Register your Blog with the O! What a Geek Team

When registering your Blog:

  • Cut and paste the url (address), of the blog YOU have created (this can be found in the address bar on the page from which you are viewing your blog), into an email message to the O! What a Geek Team
  • As you address each exercise please make this the title of your post. eg. #4 Register your Blog. Don't forget to talk about what you did in Week 1 so we can credit you for all 4 things so far!

  • Once you have registered your Blog it will be listed on Geek Blogs. Check out other Geek Blogs as to see what others are doing, gain inspiration and provide support via the comments section in the individual blogs.

Tracking your progress

First, you’ll need to register your blog after you create it in Week 2 for Things 3 & 4. (By the end of week 2 you'll have done 4 things with only 19 left to go!)

Second, you need to email the O! What a Geek Team with your name, the name and URL of your blog.

Once you start your blog you'll write a post at least each week covering the things learned that week (if you'd rather write a post for each thing that is okay too). A post should be at least 100 words. It should be more than: I completed this assignment. Try to put some thought into it. Did you like the things? What did you discover? Did you learn anything new? Was it FUN? And say why or why not. These are just ideas to get you started.

Your blog will have an RSS feed and the Think Tank O! What a Geek Team will be subscribed to your blog (so you know someone is reading) and we'll check off your progress

Wednesday, September 3, 2008

CE Credits

As an added bonus, staff members who complete all 23 things will earn 15 (fifteen) CE credit hours through the Nebraska Library Commission.

And what is even better, you have to do nothing more. Once you're registered, we'll be keep track of your progress. So we'll email Laura Johnson at the Commission to let her know who gets the credits. How is that for easy?

So if having fun, learning some new things and winning a prize aren't enough incentive for you -- how about earning those CE credits?

There will be no partial credits awarded. Credit will only be awarded if you complete all 23 things.

Friday, August 29, 2008

FAQ's

Frequently Asked Questions.

What about Privacy?

There is none! Everyone can read your Blog, this is the nature of Blogs in general.
Suggestions: You can remain anonymous by choosing a Generic Name for the Blog and hide your user profile if you wish. Keep in mind the type of Posts you make and use discretion in mentioning names/places etc. Copyright issues and intellectual content also apply to Blogs.

How do I Register?
Send the O! What a Geek team (email here) your name. In week two when you create your blog, then use the CUT and PASTE method to put your URL into an email to the team (email here) so we can monitor your progress without further work on your part.


How does this online learning program work?
This is a self-discovery program which encourages staff to take control of their own learning and to utilize their lifelong learning skills through exploration and PLAY.
Staff are encouraged to work together and share with each other their discoveries, techniques and "how to's" both in person and through their blogs.

How long do I have to complete this program?
The program begins on Tuesday, September 2nd and ends on Tuesday, December 2nd.

How do I track my progress?
Each staff member that chooses to participate in this program will be required to keep a blog to track their own progress. Basically you will make regular posts to your Blog about what you are learning, likes, dislikes etc... noting each week and addressing each 'Thing'! A Staff tracking log will be kept where your progress will be recorded.

Can I work ahead through the list of items on my own?
No, each week's link will only be activated at the beginning of that week making it easier for people to stay together on an 'even playing field'. However, you will be able to go back to activities that you were unable to complete.


What if I need help - who can I call?
Since this program is self-directed and is being completed by many staff members throughout the system simultaneously, you are encouraged to work with colleagues along your discovery journey.

Help is also available from the O! What a Geek Team (email here):

Deirdre Routt 444-4497 or droutt@omahapubliclibrary.org
Amy Mather 444-3399 or amather@omahapubliclibrary.org
Gloria Sorensen 444-3440 or gsorensen@omahapubliclibrary.org
Sarah English 444-4808 or senglish@omahapubliclibrary.org
Mary Griffin 444-3470 or mgriffin@omahapubliclibrary.org

Edit this page (you have permission)

Tips for success

This is a self paced program, to do when, and how, you can. With peoples busy schedules we understand that not everyone will be able to complete the 23 things. However, to give yourself the best possible chance to do so, here are a few tips that may help you:
  1. Why? Think about why you want to do the program, and what part these online tools play in today’s society.
  2. How are they used? Find out how other libraries are using these tools to be more productive. Here is a good place to start: Library Success: a best practices wiki
  3. Ask a colleague: Talk to other staff about getting together to work through the tasks together. Maybe a colleague who has already done the program, or is ahead of you, can mentor you and keep you enthused.
  4. A sign: Put a sign up on your PC saying “23 Things” when you are working on it, so other staff know not to interrupt you, or simply to remind you to work on it when you have a few minutes.
  5. Make it interesting: Work out what keeps you interested: celebrities, history, movies, books, cooking, sports, travel etc… and create your blog/activities around this theme.
  6. Regular time: Set aside some regular time to devote to the program in the evening, afternoon, or before you open your email each day.
  7. One day at a time: Take it a day at a time. Do not try and race, but complete each ‘thing’ at your own pace.
  8. Reward Yourself: After each task/week is completed, reward yourself with something of personal value, e.g. Chocolate (dark or milk the choice is yours), a new book or CD, a manicure, or see a movie.

Week 1

Week 1. Learning 2.0 & Lifelong Learning

Learning 2.0 is an online learning program to learn more about emerging technologies on the web that are changing the way people, society and libraries access information and communicate with each other. Over the course of the next eight weeks (but you have 3 months to do complete the program), this website will highlight “23Things” with Discovery Exercises to help you become familiar with blogging, RSS news feeds, tagging, wikis, podcasting, online applications, and video and image hosting sites.

Discovery Exercise:

  • Read the Wikipedia definition of Library 2.0 and see how Learning 2.0 impacts upon Library services. Some good resources are also listed on the Wikipedia page.
  • A useful link to a site on Life Long Learning and Library 2.0 in 15 minutes a day (this wiki is no longer being updated but the information is still available): Library Instruction Wiki

Lifelong Learning

Among libraries, lifelong learning is one of those core values we shelve our books by. So it makes sense that before we embark on this new online learning and discovery journey that we should take a few minutes to review a few habits that can assist in creating lifelong learners.

These habits, which we’ve called the Seven and 1/2 Habits of Highly Successful Lifelong Learners, will provide you with a refresher on what it means to be a lifelong learner.

Discovery Exercise:

  1. Make sure you have headphones or speakers attached to your computer.
  2. Open up the 7 & 1/2 Habits online tutorial and view the online tutorial from the original Learning 2.0 program at Public Library of Charlotte and Mecklenburg County.
  3. As you watch and listen, write down which habit among the 7 & 1/2 that is easiest for you and which is hardest. You will use your personal blog (which you will set up next) to post your thoughts about lifelong learning.


8/2008 Update: Since this tutorial has become one of the most popular features of the 23 Things program, Lori Reed (the tutorial's creator) has provided this additional link as follow-up:


Have fun! If you haven't jumped on board yet, it's never too late to become a lifelong learner.

Intro

Okay, what is this O! What a Geek: Library Learning 2.0 stuff anyhow?

Learning 2.0 is an online, self paced learning program designed to help staff discover some web 2.0 technologies freely available on the internet. The program was developed by Helene Blowers from the Public Library of Charlotte and Mecklenburg County. She has licensed the program under Creative Commons and it is now used by libraries around the world. We have also made free use of Yarra Plenty Regional Library’s adaptations.

Each topic consists of:

  • Discovery resources and instructions;
  • Activities to complete.

More information about Learning 2.0 is on the O! What a Geek blog including the 23 topics or ‘things’ for staff to complete and links to other Learning 2.0 programs done by libraries across the nation and around the world.

Equipment needed

  • Computer with Internet access (this could be a staff computer in the back room, a laptop or perhaps on a public service desk);
  • Sound card and headphones may be needed for some topics;
  • And most importantly… A sense of adventure to learn and PLAY!

Okay, that sounds all right but how can I add this to my current tasks?

  • Because it is an online program, you can control the amount of time you spend on each activity.
  • Aim for 15 minutes a day playing with the new technology, though you may find yourself doing quite a bit more!